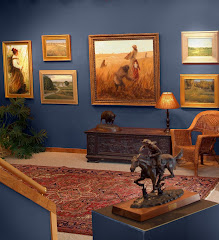
We received several comments during the First Friday Art Walk featuring
Gary Ozias about the way of several pieces were artfully displayed on the wall. The talented artist Gary Ozias presented several small pieces so we were faced with the challenge of hanging them for a show. As art patrons this is an ideal way to hang an opportunity add to your collection as well. So, let me tell you a little about how to select and hang your own collection in your home because a picture wall can also be a significant design element in your home or office and a great source of enjoyment.
Creating a Picture Wall
A picture wall displays a group of framed items in a coordinated design. The frames may all be the same style or the same color, but most often a picture wall includes a variety of different frames. The artwork may be united by a theme: vacation photos, a collection of sports memorabilia, family portraits. Or they may be connected by subject matter: coastal scenes depicted in photos, watercolor paintings, old engravings, and other media. Color can be the unifying factor, and color-themed picture walls have a lot of impact, bringing the coolness of blue or the vibrancy of red strongly into the room. Collectors of posters, etchings, photographs or watercolors can develop a picture wall to show the variety within their collection. But some of the best picture walls display a very eclectic mix of sizes, colors and styles that reflects a range of personal preferences and experiences. And it doesn't have to be limited to pictures: an arrangement can be enhanced by including mirrors, shelves, or objects in the mix.
When placing several different sizes of frames and art together, arrange each piece so that one outside edge is in line with another picture next to it, either vertically or horizontally. This technique helps bring a sense of balance to the grouping. Keep the space between frame edges fairly small, typically about two to four inches; this will visually "gather the group together". The grouping can build from the center and spread out in all directions. Or you can plan to have it develop into a rectangular shape. An irregular shape is very useful if you are likely to add to the wall after the first design is finished.
One thing about a picture wall: it involves a few nail holes. If you are a bit anxious about making those holes in the right spot the first time, there are a couple of ways to determine your spacing before hanging: try organizing the picture arrangement on the floor in front of the wall where it will hang, then hang the pieces one-by-one. To get a more accurate visualization, cut pieces of newspaper to the size of the framed items and tape them to the wall with removable tape.
When hanging pictures above a sofa, be sure that the bottom of the lowest frame leaves clearance for the head of a seated person. But don't go any higher, or the pictures will seem to be floating instead of visually attached to the sofa. If there is no furniture against the picture wall, and there are a number of frames, the arrangement can cover the entire wall from ceiling to floor for a dramatic presentation.
Light is necessary to enjoy the picture wall, but avoid direct sunlight or other strong direct light on the art. Keep track lighting and overhead picture lights away from close contact with artwork-heat from the bulbs can cause damage to the art, and fluorescent lights (including the new compact curly bulbs) may cause fading of some artwork.
Choose a wall and gather a few of your favorite images and you will be on your way!
Framewoods also provides professional picture hanging services, so if you are not a DIY type of person give us a call and we’ll be happy to help you display your collection.


